June 21st saw this year’s summer solstice, which was made even more auspicious this year by falling on a full moon for the first time in around fifty years! There’s something very magical about this – a once or twice in a lifetime opportunity to see the ultimate yang symbol, the sun, share the sky with the ultimate yin symbol of the full moon – a visual representation of the earth’s energy being completely in balance.
It makes me think of the balance and power of the humble sun salutation. I am often asked what a good home practice routine is and, for those who just want something general, I usually direct them towards trying to do at least five sun salutations at least three times a week – it’s better to practise ‘little and often’ rather than indulging in a very occasional big yoga splurge. If ten minutes of sun salutations can become part of your daily routine, like brushing your teeth, then you will soon start to notice a difference in your body and, eventually, your mind too.
And, with the solar energy being at its peak at this time of year, it’s a great time to harness this and start this new habit – soon you’ll feel ‘solar-charged’, especially if you’re able to practise outside. There’s something wonderful about knowing you’re absorbing the sun’s rays as you pay homage to it with your practice – it’s like a mutual love-in!
The sun salutation provides a very rounded, balanced asana practice – it has a forward bend and a back bend, therefore it lengthens both the front and back of the body. But also it has some great strength work for legs and core and is brilliant for grounding and finding your feet. If you can, try and build up to doing at least five rounds. As you go through each round, try and match each movement with one breath, so that eventually it becomes a fluid, moving, breath-led meditation. At the start, though, you may feel you need to take more than one breath in some postures, especially the bigger transitional moves, which of course is fine. I’ve indicated the correct breathing with each movement below.
Finally, please note that there are many different ways to practise sun salutations and all are brilliant! This particular style comes from ashtanga yoga, although with some suggested variations included. Ideally, when you’ve finished, try and complete your practice with a few minutes of sitting peacefully and mindfully breathing and/or lying on your back and relaxing the body in savasana (corpse pose).

- Stand in tadasana, mountain pose. Straighten the whole body, with all muscles engaged, shoulders drawn back and down away from the ears, feet pressing actively into the ground. Open the chest forward and tuck the chin slightly in. Take a full breath here to prepare.

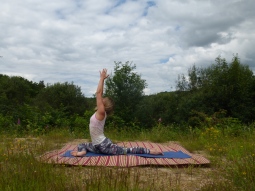
- On an INHALE, turn the palms outwards and raise the hands above the head, looking upwards towards them. Try and match breath in movement so the hands begin to move at the start of the inhale and come together at the end of the inhale. Imagine you really are reaching upwards to joyfully greet the sun.

- As you EXHALE, take the hands down to the floor and fold in towards the legs – you can bend the knees as much as you need to find contact with the floor. Imagine that with this humble gesture you are making contact with the earth and expressing huge gratitude for the sun’s energy and creation of life on this planet.

- As you INHALE, look up and straighten the spine as much as possible, drawing the shoulders down and away from the ears. If you can’t keep your hands or fingertips on the floor as you do this, you can place them on your shins instead and try and straighten the spine from there.
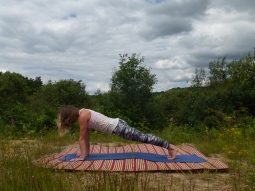

- As you EXHALE, step back into either plank (hard version, photo on left) or tabletop with knees on the floor (easier version, photo on right). Either way, the shoulders are above the wrists and you push actively through the hands to engage the arms and the upper back muscles. Also engage your core by drawing the navel upwards towards the spine and drawing up on your perineal muscles. If you’re in plank, also make sure you firm up the fronts of the thighs and draw the heels backwards.
- Take a full INHALE in plank or tabletop (NB you can skip this and just do the next movement on the same exhale as number 5 but I think it works well to take the extra inhale here, so you have a chance to work the core/arm/leg muscles for longer, and to ensure integrity of movement).
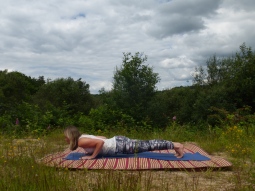
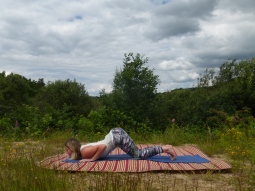
- If you’re in plank position, EXHALE to lower to chaturanga dandasana (stick pose, left hand photo), keeping the elbows in and drawing the shoulders back and down to activate upper back muscles. Or if you’re in tabletop position, on an EXHALE lower the chest to the floor between the hands, keeping the hips high and looking forward (right hand photo). Draw the shoulders back and keep the elbows in.


- On and INHALE roll over the toes and come into upward dog (left hand photo). Feel like you’re openly presenting your solar plexus (where manioura chakra is located) to the sun, to maximise absorption of its rays. Draw the shoulder-blades down the back and move the chest forward between the upper arms. To make this more active, you can engage the front of the thighs to bring them off the floor and straighten the arms fully. To make this softer, you can keep the elbows on the floor beneath the shoulders for cobra position (right hand photo – spot the costume change, lol!).
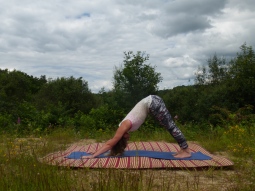
- On and EXHALE roll over the toes again and come into downward dog, feet hip distance apart. Take at least five slow, deep breaths through the nose here and really feel the connection to the earth beneath you through your hands and feet. Look back towards the feet or up to the navel if you wish to work harder with the core. Be aware of your core muscles activating and firm up the front of the thighs. Have active hands, spreading the fingers wide and pushing the palms into the mat.
- On an INHALE, step the feet between the hands one at a time then look up, straightening the spine and drawing the shoulders back.
- On an EXHALE fold into the legs, bending the knees if required.
- On an INHALE raise the hands above the head, palms together, and look up.
- As you EXHALE, bring the hands back to your sides and re-establish tadasana posture, so that you’re ready to go through the sequence again as the next inhale comes. The idea is to keep moving, to build some heat and some fiery, yang solar energy, but if you need to slow down (e.g. if your heart rate rises too much) then you can always take an extra breath or two in tadasana between rounds.
If you want to add in some variations or extend the practice further, you could try stepping one foot forward from downward dog on an inhale and holding the following postures for a few breaths, then stepping back to downward dog on an exhale then swapping legs:

- Warrior 1 lunge variation with rear heel lifted. Front knee should be above the ankle or behind it, not in front. Draw the rear heel backwards actively to engage the back leg. You can place the rear knee on the floor if you need to. Great for building strength through the body.

- Warrior 1 lunge with back heel down, toes in front of the heel and slightly out to the side. It’s harder to keep the hips square in this variation, but try and do so as much as possible by drawing the hip of the rear leg forward as much as possible. Also a great strength-builder and also opens the hips a little more than the previous variation.

- Crescent moon lunge – this time the front knee can be in front of the ankle. Keep the front heel on the floor and sink low and forward into the hips. You should feel a stretch across the rear hip flexor and thigh as well as getting deep into the front hip. You can turn it into a backbend too by taking the hands backwards a little bit, but try not to collapse into the lower spine as you do so; keep lifting upwards through the torso and arms.
- Pigeon – take the front knee out to the side with the shin across the body. The foot can either be in line with the knee (as in the photo) for more of a stretch, or closer to the hip for a less intense stretch, but make sure the foot doesn’t come beneath the hip. Stretch the rear leg backwards as far as possible and press actively through the top of the foot. Great outer hip and thigh opener. To also create a lower back stretch, you can lie down over your front leg, with arms outstretched ahead of you on the floor.
